This is a complement to a related post on how to turn any printer into a network printer, but for a scanner. Using the same low-cost Raspberry Pi hardware you can scan over Ethernet or Wifi.
Requirements
- A Scanner
- Raspberry Pi
- A compatible scanner.
Many USB scanners will work with the smallest amount of effort. Other types would require a USB to "whatever" adapter.
Make sure your scanner is compatible with SANE. Check the supported devices section on the website for information. Anything that's Complete, Good, Basic, or even Minimal should work out of the box. If your device is not listed then it may or may not work with some extra effort.
Install FreeBSD
This part is covered on the printer into a network printer post. It's perfectly fine to use the same Raspberry Pi for both functions.
Here's a quick reminder on how to get a FreeBSD 12.2 snapshot on to an SD card for a Raspberry Pi B:
fetch http://ftp.freebsd.org/pub/FreeBSD/snapshots/arm/armv6/ISO-IMAGES/12.2/FreeBSD-12.2-STABLE-arm-armv6-RPI-B-20210318-r369477.img.xz
unxz FreeBSD-12.2-STABLE-arm-armv6-RPI-B-20210318-r369477.img.xz
dd if=FreeBSD-12.2-STABLE-arm-armv6-RPI-B-20210318-r369477.img.x of=/dev/your/sd/card
Log into FreeBSD with SSH using the freebsd user. The password is the same as the username. Then you can su to root (password is root). Use the passwd command to change passwords as needed.
Using the Latest Package Repository
There is chance that the graphics/sane-backends package is not available in the default quarterly package repository. If you find yourself in this situation you have two options. Switch to the Latest or use your own.
Start by disabling the system default repository:
mkdir -p /usr/local/etc/pkg/repos
echo "FreeBSD: { enabled: no }" > /usr/local/etc/pkg/repos/FreeBSD.conf
Configure pkg to use the FreeBSD latest repository:
sh -c 'echo -e "Latest: {\n\turl: "pkg+http://pkg.FreeBSD.org/\${ABI}/latest",\n\tenabled: yes\n}" > /usr/local/etc/pkg/repos/Latest.conf'Or to use a custom repository. For example, I publish a repository for armv6 that only has the packages I need for this device:
sh -c 'echo -e "PrintServer: {\n\turl: "pkg+http://pkg.ny-us.morante.net/printserver/\${ABI}",\n\tenabled: yes\n}" > /usr/local/etc/pkg/repos/PrintServer.conf'Then run a "pkg update" to refresh the catalog:
# pkg update
Updating PrintServer repository catalogue...
PrintServer repository is up to date.
All repositories are up to date.
Install Packages
Install the graphics/sane-backends package and it's dependencies (there are unfortunately a lot) using pkg.
pkg install sane-backendsIt will take several minutes while the packages download and install.
Configure Devd
When sane-backends is done installing it will ask you to create a file for devd under /usr/local/etc/devd/saned.conf when using a USB scanner. The purpose of which is to allow the sane daemon access to the USB device file for the scanner. Before we can do that we need to gather some information about our scanner.
Lets start by listing all our USB devices using usbconfig to determine which one is our scanner. It might help to run this before and after connecting your scanner if it's not obvious to figure it out from the output.
Run usbconfig list to print a list of all connected USB devices:
ugen0.1: <DWCOTG OTG Root HUB> at usbus0, cfg=0 md=HOST spd=HIGH (480Mbps) pwr=SAVE (0mA)
ugen0.2: <vendor 0x0424 product 0x9512> at usbus0, cfg=0 md=HOST spd=HIGH (480Mbps) pwr=SAVE (2mA)
ugen0.3: <vendor 0x0424 product 0xec00> at usbus0, cfg=0 md=HOST spd=HIGH (480Mbps) pwr=ON (2mA)
ugen0.4: <Hewlett-Packard HP Color LaserJet 1600> at usbus0, cfg=0 md=HOST spd=HIGH (480Mbps) pwr=ON (98mA)
ugen0.5: <hewlett packard hp scanjet> at usbus0, cfg=0 md=HOST spd=HIGH (480Mbps) pwr=ON (2mA)
From the output above it's easy to see that my scanner (Hewlett Packard HP ScanJet) is connected to the port named ugen0.5.
The next step is to grab the vendor and product ID's for this device (again) using usbconfig so that devd can match using those instead of always looking at a specific USB port.
This time run usbconfig -d X.Y dump_device_desc where X and Y correspond to the port numbers for your USB device. In my case X=0 and Y=5.
ugen0.5: <hewlett packard hp scanjet> at usbus0, cfg=0 md=HOST spd=HIGH (480Mbps) pwr=ON (2mA)

  bLength = 0x0012
  bDescriptorType = 0x0001
  bcdUSB = 0x0200
  bDeviceClass = 0x0000  <Probed by interface class>
  bDeviceSubClass = 0x0000
  bDeviceProtocol = 0x0000
  bMaxPacketSize0 = 0x0040
  idVendor = 0x03f0
  idProduct = 0x2305
  bcdDevice = 0x0100
  iManufacturer = 0x0001  <hewlett packard>
  iProduct = 0x0002  <hp scanjet>
  iSerialNumber = 0x0000  <no string>
  bNumConfigurations = 0x0001
From the above for my HP Scanner, I need to use "idVendor = 0x03f0" and "idProduct = 0x2305".
Create a new file with the following contents while substituting the values for vendor (idVendor) and product (idProduct). Save this file as /usr/local/etc/devd/saned.conf.
mkdir -p /usr/local/etc/devd/
cat << EOF >/usr/local/etc/devd/saned.conf
notify 100 {
        match "system" "USB";
        match "subsystem" "INTERFACE";
        match "type" "ATTACH";
        match "cdev" "ugen[0-9].[0-9]";
        match "vendor" "0x03f0";
        match "product" "0x2305";
        action "chown -L saned:saned /dev/\$cdev && chmod -L 660 /dev/\$cdev";
};
EOF
Note: I use saned as the owner since I do not have CUPS installed.
Restart devd to apply the changes
service devd restartUnplug and re-plug in the scanner (or reboot) to have the rule execute. I can verify that it worked by looking at the owner to the USB device file. Note: /dev/ugen0.5 is a symlink to /dev/usb/0.5.0
# ls -plarths /dev/usb/0.5.0
0 crw-rw----  1 saned  saned   0x5f Mar 21 05:01 /dev/usb/0.5.0
Setup SANE
Test if SANE is able to connect to your scanner using the the scanimage command. There might be a slight pause while it communicates with the hardware.
Run scanimage -L to see if SANE is working properly.
device `hp3900:libusb:000:005' is a Hewlett-Packard Scanjet 3970 flatbed scannerThe above shows that SANE can correctly work with the scanner. If you got something else then your scanner is probably not supported or something went wrong with the USB setup steps. The best place to find help is on SANE's website or the FreeBSD Handbook page on the topic. Unfortunately, I haven't had much luck with getting unsupported scanners to work with SANE.
It's usually a good idea to comment out any backends you are not using from /usr/local/etc/sane.d/dll.conf. The best way to do this is to rename the existing file as /usr/local/etc/sane.d/dll.conf.orig and create a new file with just the backend you need.
Based on the output of scanimage -L, I can see that the backend in use is hp3900. Create a new dll.conf file with just that backend.
mv /usr/local/etc/sane.d/dll.conf /usr/local/etc/sane.d/dll.conf.orig
echo "hp3900" > /usr/local/etc/sane.d/dll.conf
Run scanimage -L again to make sure it still works. You'll notice it's faster this time.
Since this is going to be a network scanner service we need to allow clients to connect to it. This is controlled by the saned.conffile located under /usr/local/etc/sane.d. The default values should be suficcient for most people, but be sure to read through the file to see if there is anything you might need to change. You probably want to limit scanner access to just you local subnet.
Open the file and add a line granting access to your subnett.
# saned.conf
# Configuration for the saned daemon
...
192.168.0.1/16
The entry 192.168.0.1/16 lets any client with an IP address falling in that range access the scanner.
Enable the Service
Enable the service using the sysrc command. This will launch the daemon at startup.
sysrc saned_enable="YES"Start the service
service saned startConnect a Client
There are several ways to connect clients, and we'll discuss them in more detail in future posts. For now, lets download a simple Java based client to test stuff out.
Go to swingsane.com and download the application according to the platform you are using as a client. If your platform is not listed, use the JAR file.
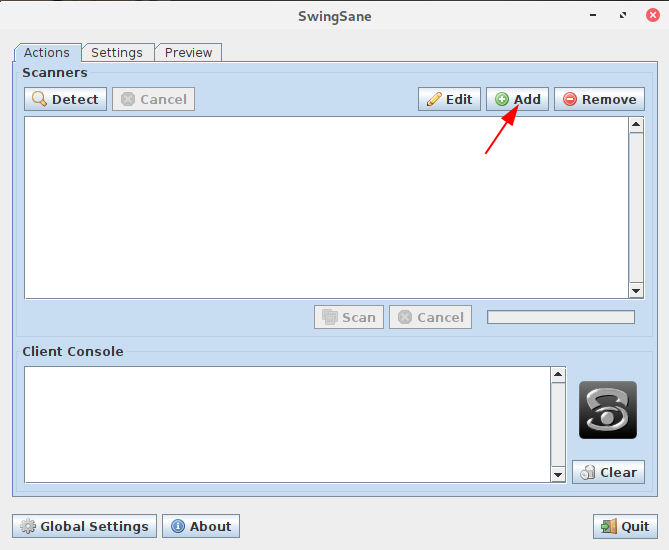
java -jar swingsane-0.2.jarClick the "Add" button to bring up the "Add a Scanner" dialog.

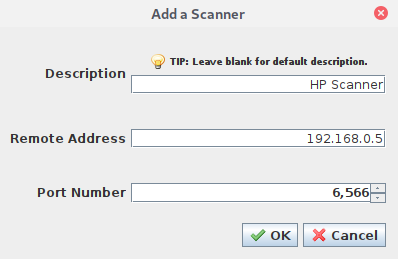
Type in the IP address of your scanner server (IP of the Raspberry PI) and a description for the scanner. Leave the port number as is (unless you changed it on the server). Click "OK" to continue.

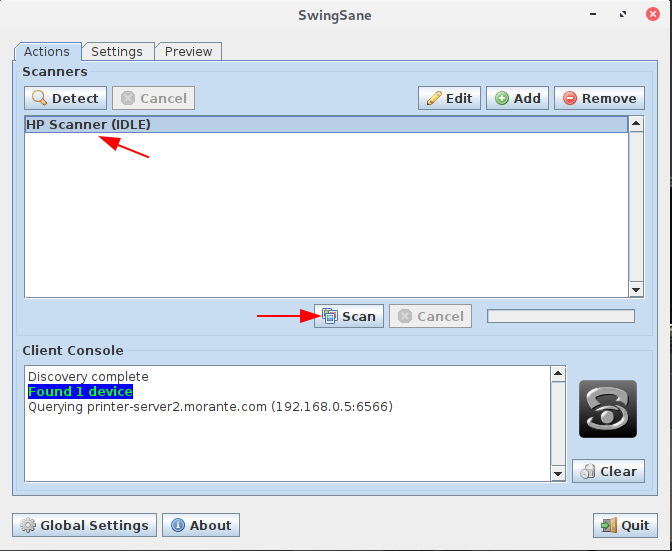
In the console you will see the application attempt to connect to the scanner.

Click "OK" when asked to add the scanner.

The scanner has been successfully setup and you can now scan.

Look out for additional post on how to setup additional clients using SANE and how to get Windows clients setup.
- Log in to post comments


.png)