Streaming live video via Flash over RTMP can be done on FreeBSD with minimal effort. We will use the FreeBSD operating system, the Red5 RTMP server, and the Adobe Flash Media Live Encoder.
System Requirements
- Windows XP (or greater) or Mac OS X 10.5+
- FreeBSD (tested on version 8.1)
- Internet Connection
- Live video source (webcam)
- Modern Web Browser (tested on Mozilla Firefox 6.0)
- Adobe Flash Player (tested on version 10.3)
It's always best to make sure the ports tree is up to date on your FreeBSD system. If this is a new installation of FreeBSD, then you are good to go.
How it Works
We will have one system acting as the capture/encoder and another system acting as the media server. The encoder will PUSH live video TO the server and clients will connect to the server to PULL the live streaming video. Adobe Flash Media Live Encoder is our capture/encoder program and Red5 is our media server.

Install a JDK (Java Development Kit)
If you don't have one already, Red5 requires that we install a JDK (not a JRE) on the FreeBSD server. For this setup we will use Diablo Caffe JDK. If you already have a JDK installed, you may skip this section.
In order to proceed with the diablo-jdk port installation we must download the source tarballs from the Internet. The process involves selecting the correct version for your platform and agreeing to a license agreement. When we attempt to build the port, FreeBSD will automatically tell us what we need.
From the command prompt browse to the port directory and issue the make install command. The latest version as of this writing is JDK 1.6
cd /usr/ports/java/diablo-jdk16/
make install
The port installation will fail with a message similar to the one below:
 Because of licensing restrictions, you must fetch the distribution
 manually.

 Please access

     http://www.FreeBSDFoundation.org/cgi-bin/download?download=diablo-caffe-... with a web browser and "Accept" the End User License Agreement for
 "Caffe Diablo 1.6.0".

 Please place the downloaded file(s) in /usr/ports/distfiles.

*** Error code 1

Stop in /usr/ports/java/diablo-jdk16.
*** Error code 1

Stop in /usr/ports/java/diablo-jdk16.
FreeBSD is asking us to download the diablo-caffe-freebsd7-i386-1.6.0_07-b02.tar.bz2 tarball. Go ahead and copy and paste the link shown in your output into your web browser. Accept the agreement and download the file to your computer. When the download is complete, you will need to copy that file into your distfiles directory which is usually /usr/ports/distfiles.
Once you have the file in the correct location, go ahead and re-issue the make install command.
make install
...
===>   Registering installation for diablo-jdk-1.6.0.07.02_16
This time the port should build and install correctly, if the installation fails ensure that your ports are up to date and try again.
Install Red5
Installing Red5 on FreeBSD is very straight forward. The port pretty much takes care of everything. Log on to your FreeBSD console, browse to the port's directory and install it.
cd /usr/ports/www/red5
make install
When the port has finished installing, you'll need to edit your rc.conf file to allow the Red5 server to start. Open up /etc/rc.conf in your favorite text editor and add the following line to the end. (If you have Webmin, you can do this from the "Bootup and Shutdown" section under "System".)
red5_enable="YES"Next, we must allow network connections to our server. Edit the file /usr/local/red5/conf/red5.properties and change all the instances of 127.0.0.1 to 0.0.0.0. For example:
...
# HTTP
http.host=0.0.0.0
http.port=5080
https.port=8443

# RTMP
rtmp.host=0.0.0.0
rtmp.port=1935
rtmp.io_threads=16
rtmp.connect_threads=4
rtmp.send_buffer_size=271360
rtmp.receive_buffer_size=65536
rtmp.ping_interval=1000
rtmp.max_inactivity=60000
rtmp.tcp_nodelay=true
...
We must enable the RTMPTLoader, otherwise our sever won't work properly. Do this by un-commenting the RTMPT section in the /usr/local/red5/conf/red5-core.xml file. This is located in and around line 117 through 153, just remove the XML comment tags at the beginning and end.
Finally, we can start our Red5 server. Simply issue the following command (or if your using Webmin, do it from the Bootup and Shutdown section.)
service red5 startVerify that the server is working by connecting to it on port 5080 from your web browser. For example: http://freebsd.domain.tld:5080 You should see the Red5 logo with links to demos. Click on Launch a demo and click on the Shared Ball demo to verify it loads. The demo won't do anything, we just want to make sure that the page loads with no errors.
At this point, we have a fully functional RTMP server. Make sure (if necessary) to open or forward tcp port 1935 to your FreeBSD server so it is accessible from the Internet.
Install a Streaming Video App on Red5
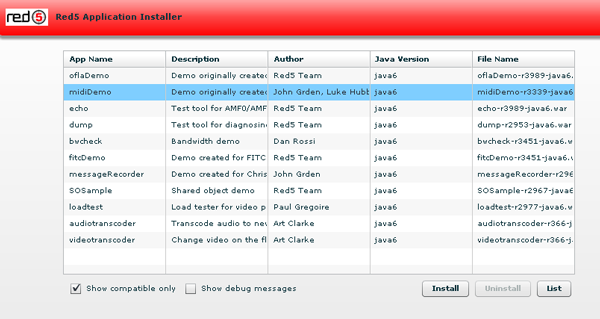
Now that we have a RTMP server we must setup Red5 with a streaming video application, otherwise we just have a RTMP server that doesn't do anything. Luckily, this is as simple as pushing an install button since Red5 comes with a functional demo app called midiDemo.
To install the demo application, browse to http://<red5-server>:5080/installer. Select midiDemo from the list and click Install.

Once installed, we are ready for the fun part.
Adobe Flash Media Live Encoder
The quickest way to stream video to your Red5 server is to use the graphical and very easy to use Adobe Flash Media Live Encoder on Windows or Mac OS X.

Download and install the encoder for your platform from Adobe's website: http://www.adobe.com/products/flashmediaserver/flashmediaencoder/.
You'll need to register with Adobe in order to proceed to the download page. This software is completely free. Once your encoder is ready, open it up and select your audio and video sources. You can configure your sources by clicking on the wrench icon.

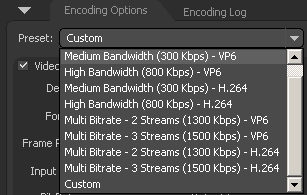
The media encoder offers several presets to save time. Select the preset that best fits your needs.

If you want to tweak your stream settings, you may do so using the on screen options.

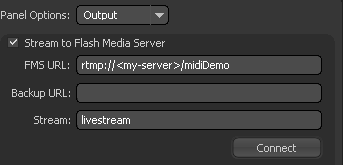
Next, we connect the media encoder to the streaming video server. To do this enter the FMS URL and Stream name, then click connect. The FMS URL will be rtmp://<red5-server>/midiDemo and the stream name can be whatever you want.

Click the Connect button, you should recive no errors and the button should change to Disconnect.
At this point, you can click on Start to begin streaming live video to your server.

View Live Stream
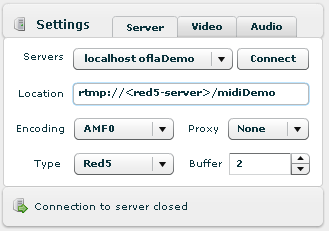
To view your live stream, you can use one of Red5's demo apps. Navigate to http://<red5-server>/demos/publisher.html. In the Location box type in the FMS URL from above and click Connect.

You should recive a Connection Success message in the log window.
![]()
In the Monitor box, type the name of your stream name.

Click on the Play button and you should see your video!
Publish Live Streaming Video on a Web Page
At this point you are already publishing live streaming video through RTMP. However, you probably want to embed this live video stream on a web page to make is easy for visitors to view the video stream. To do this, you will need a Flash video player. Their are literally hundreds available, some free, some paid. Two of the best are JW Player and Flowplayer. In this example, we will use Flowplayer.
Download the Flowplayer and the RTMP Plugin from the Flowplayer website. This HelpFile assumes you are using Flowplayer 3.2.x series.
- Flowplayer (GPL): http://flowplayer.org/download/index.html
- RTMP Plugin: http://flowplayer.org/plugins/streaming/rtmp.html
Extract all the files and place the following files on your webserver:
- flowplayer-3.2.x.min.js
- flowplayer.rtmp-3.2.3.swf
- flowplayer-3.2.x.swf
- flowplayer.controls-3.2.x.swf
Create a new HTML file and add the JavaScript file to it in the head area.
<script type="text/javascript" src="flowplayer-3.2.6.min.js"></script>Create an empty div tag to hold the video. You may also define any CSS styles.
<div style="display:block;width:520px;height:330px" id="player"></div>Insert the following inline JavaScript and replace the values accordingly.
<script>

    $f("player", "flowplayer-3.2.7.swf", {
      clip: {
        url: 'livestream',
        live: true,
        provider: 'influxis'
      },

      plugins: {
        influxis: {
          url: 'flowplayer.rtmp-3.2.3.swf',
          netConnectionUrl: 'rtmp://<red5-server>/midiDemo'
        }
      }
    });
    </script>
The values that need to be replaced are:
- clip url: stream name (Example: livestream)
- netConnectionUrl: FMS URL (Example: rtmp://<red5-server>/midiDemo)
Save the HTML file and upload it to your server. Then, using your web browser open the URL to the HTML file. Your video should play.


.png)